Publish RTMP stream using XSplit
XSplit is a free and open source software for live streaming and video recording. It is easy to use and provides a great canvas with a screen share option for different purposes (PC gaming, talk shows or presentations). Embedded or external cameras and audio sources can be used with XSplit.
Install XSplit
Download XSplit from xsplit.com and install it.
Provide sources
When you open XSplit, it will ask for the canvas option for different purposes. They are easy to manipulate with drag and drop. It has some useful features for streaming, for further information you can google about XSplit tutorial.
Configure XSplit
We're assuming that your Ant Media Server accepts all streams (There is no any security option enabled.)
-
Click
Broadcastin the XSplit window and then clickSet up a new output -
Choose
Custom RTMPin the dropdown menu as shown below.
-
You can write any name and description you want.
-
In the RTMP URL box, type your RTMP URL without stream id. It's like
rtmp://your-server-IP-or-domain/live -
In the stream key, you can write any
stream Idbecause we assume that no security option is enabled.
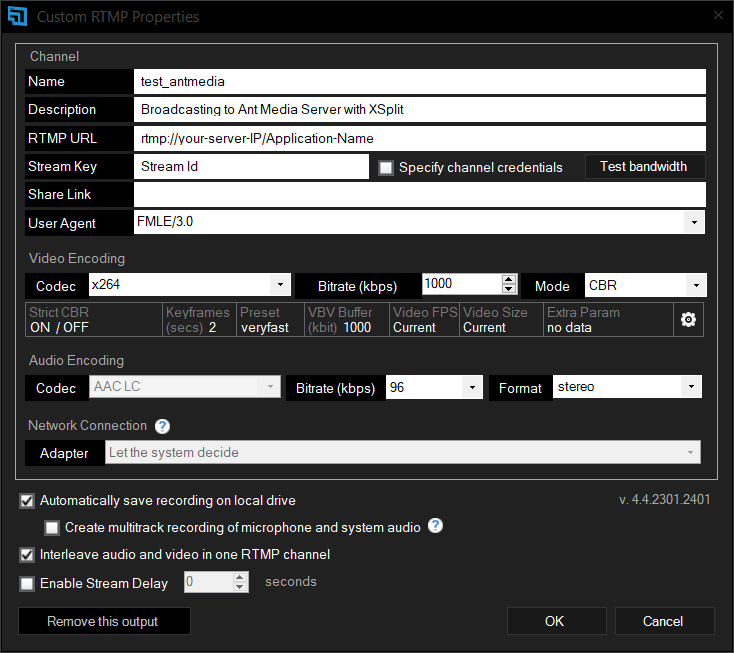
When you're using any token type for stream security, you need to generate a publish token and use it in this format inside the stream key: streamdId?token=tokenid
Start streaming
Close the Settings window and simply click the Stream button in the main XSplit window. It will begin streaming.
You can view the stream in your browser by entering the following URL:
http(s)://IP-address:5080(5443)/live/play.html?name=streamId
Check here for more information on playback.
Stream On! 🎮
You’ve now configured XSplit with your RTMP URL and Stream Key (plus token if needed), provided sources, set up the output, and hit “Stream.” You can view your live stream in the browser via the play URL.
Nice work— your broadcast is live, flexible, and ready for whatever content you throw at it! 🎤