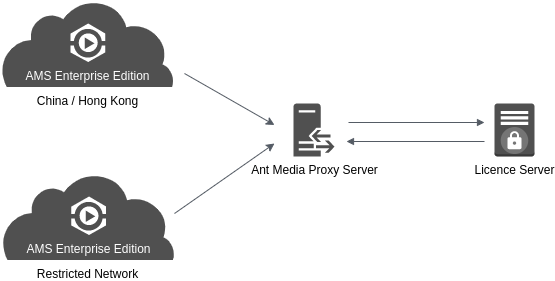
Activate Ant Media Server in Restricted Geographies
Ant Media uses Google services to verify the license key, which are banned in China and Hong Kong.
For this reason, it’s not possible to verify the Ant Media license key using Google services.
In this article, I'll provide two options to get around these restrictions and explain them step by step.
The two options are:
- A proxy service, provided free for Ant Media Enterprise users.
- A self-hosted proxy server
1. Free Proxy service for Enterprise Users
Ant Media offers this to Enterprise users for free. To access the free service, simply send an email to [email protected] to receive a username and password.
After receiving a username and password, run the following command, then restart the Ant Media Server.
echo "proxy.address=username:[email protected]:80" >> /usr/local/antmedia/conf/red5.properties
systemctl restart antmedia
That's it! You can now verify your license over a restricted network.
2. Self-Hosted Proxy Server
We are going to use Squid as the proxy server.
To get started, first have Ubuntu 22.04 or Ubuntu 20.04 server installed in an unrestricted region.
Once you've got a running Ubuntu installation, continue to install Squid proxy with the below steps.
1. Installing Squid server
apt update
apt install squid apache2-utils -y
2. Backup existing configuration.
mv /etc/squid/squid.conf{,_bck}
3. Modify the squid configuration
Open the squid.conf file located at /etc/squid/squid.conf with an editor
vim /etc/squid/squid.conf
Add the following lines into squid.conf file.
acl whitelist dstdomain us-central1-ant-media-server-license.cloudfunctions.net
acl SSL_ports port 443
http_access deny !Safe_ports
http_access deny CONNECT !SSL_ports
http_access allow localhost manager
http_access deny manager
include /etc/squid/conf.d/*.conf
auth_param basic program /usr/lib/squid/basic_ncsa_auth /etc/squid/passwords
auth_param basic realm proxy
acl authenticated proxy_auth REQUIRED
http_access allow localhost
http_access allow authenticated whitelist
http_access deny all
http_port 3199
coredump_dir /var/spool/squid
refresh_pattern ^ftp:		1440	20%	10080
refresh_pattern ^gopher:	1440	0%	1440
refresh_pattern -i (/cgi-bin/|\?) 0	0%	0
refresh_pattern \/(Packages|Sources)(|\.bz2|\.gz|\.xz)$ 0 0% 0 refresh-ims
refresh_pattern \/Release(|\.gpg)$ 0 0% 0 refresh-ims
refresh_pattern \/InRelease$ 0 0% 0 refresh-ims
refresh_pattern \/(Translation-.*)(|\.bz2|\.gz|\.xz)$ 0 0% 0 refresh-ims
refresh_pattern .		0	20%	4320
Save and close the editor.
4. Create a username and password for authentication
htpasswd -c /etc/squid/passwords username
Now, Let's restart the squid service as follows.
systemctl restart squid
5. Test the installation
Use the following curl command to check that everything is working correctly.
curl -x "http://username:password@your_proxy_server:port_number" -X POST -H "Content-Type:application/json" https://us-central1-ant-media-server-license.cloudfunctions.net/license_valid -d '{"key":"your_license_key"}' -w "\n"
If the output of the above command returns a "valid" value, your license can be verified.
6. Add the settings for Ant Media Server.
echo "proxy.address=username:[email protected]:80" >> /usr/local/antmedia/conf/red5.properties
Finally, restart the Ant Media Server.
systemctl restart antmedia
You can now go to the Dashboard and enter your license key in the settings.
🔓 License Verified, Barriers Bypassed! 🌍
You’ve enabled proxy support (either free or self-hosted) so your Ant Media Server can verify its license—even from within restricted regions. No more blocked verification, no more frustration.
Your setup is now licensed, connected, and unstoppable — wherever you are! 🚀